


Before we start off, what is Spring and why Spring?
Spring is a Java framework mainly used to build web applications on the server-side 😄
What do we aim at building today?
A simple web app's API that will deal with the incoming requests and send a response back.
Tools and Technologies we will be using?
It would be great if you have the JDK package which includes the compiler and the JRE, but in case you do not have it installed you can do it from this link: oracle.com/in/java/technologies/javase-down..
I use Java 11 but any version of java above 8 should have you good and 11+ is preferred.
I personally like writing my Java code in IntelliJ Idea(jetbrains.com/idea) but you could use your favorite text editor!
- Postman, to test our API(postman.com)
- There's no step 4 we're good to go!
Github Repositories
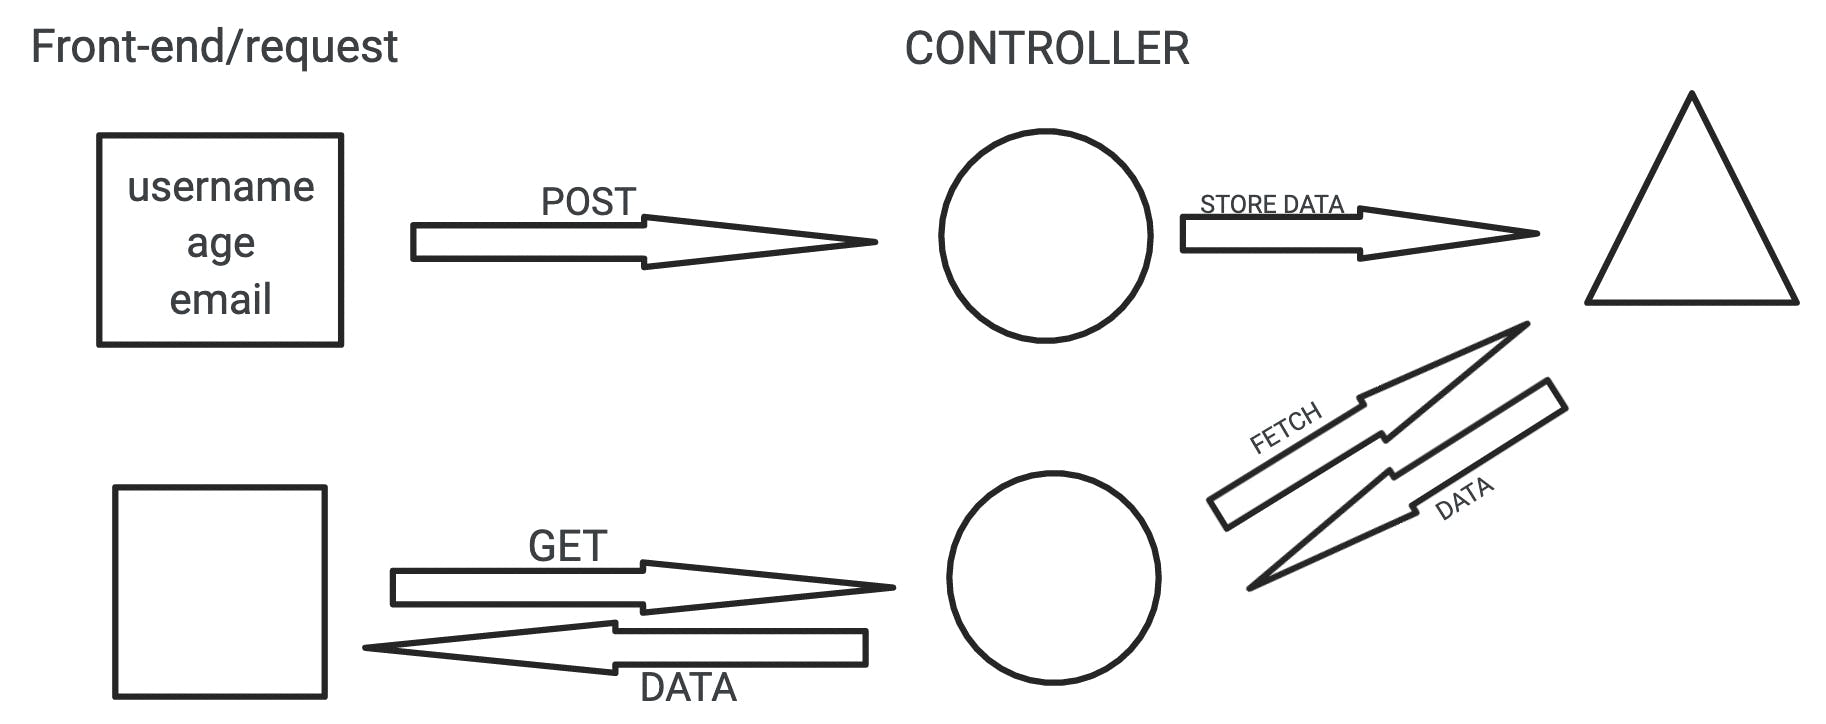
API Design
We will be sending 2 requests, one will be a get request and the other will be a post request.
Visually, to understand this we can have a look at the diagram below:
Getting Started
So finally we're gonna start off, yay!
Let's head over to start.spring.io and initialize our spring project by adding dependencies and giving the project a name.
You'll see a screen that looks something like this:
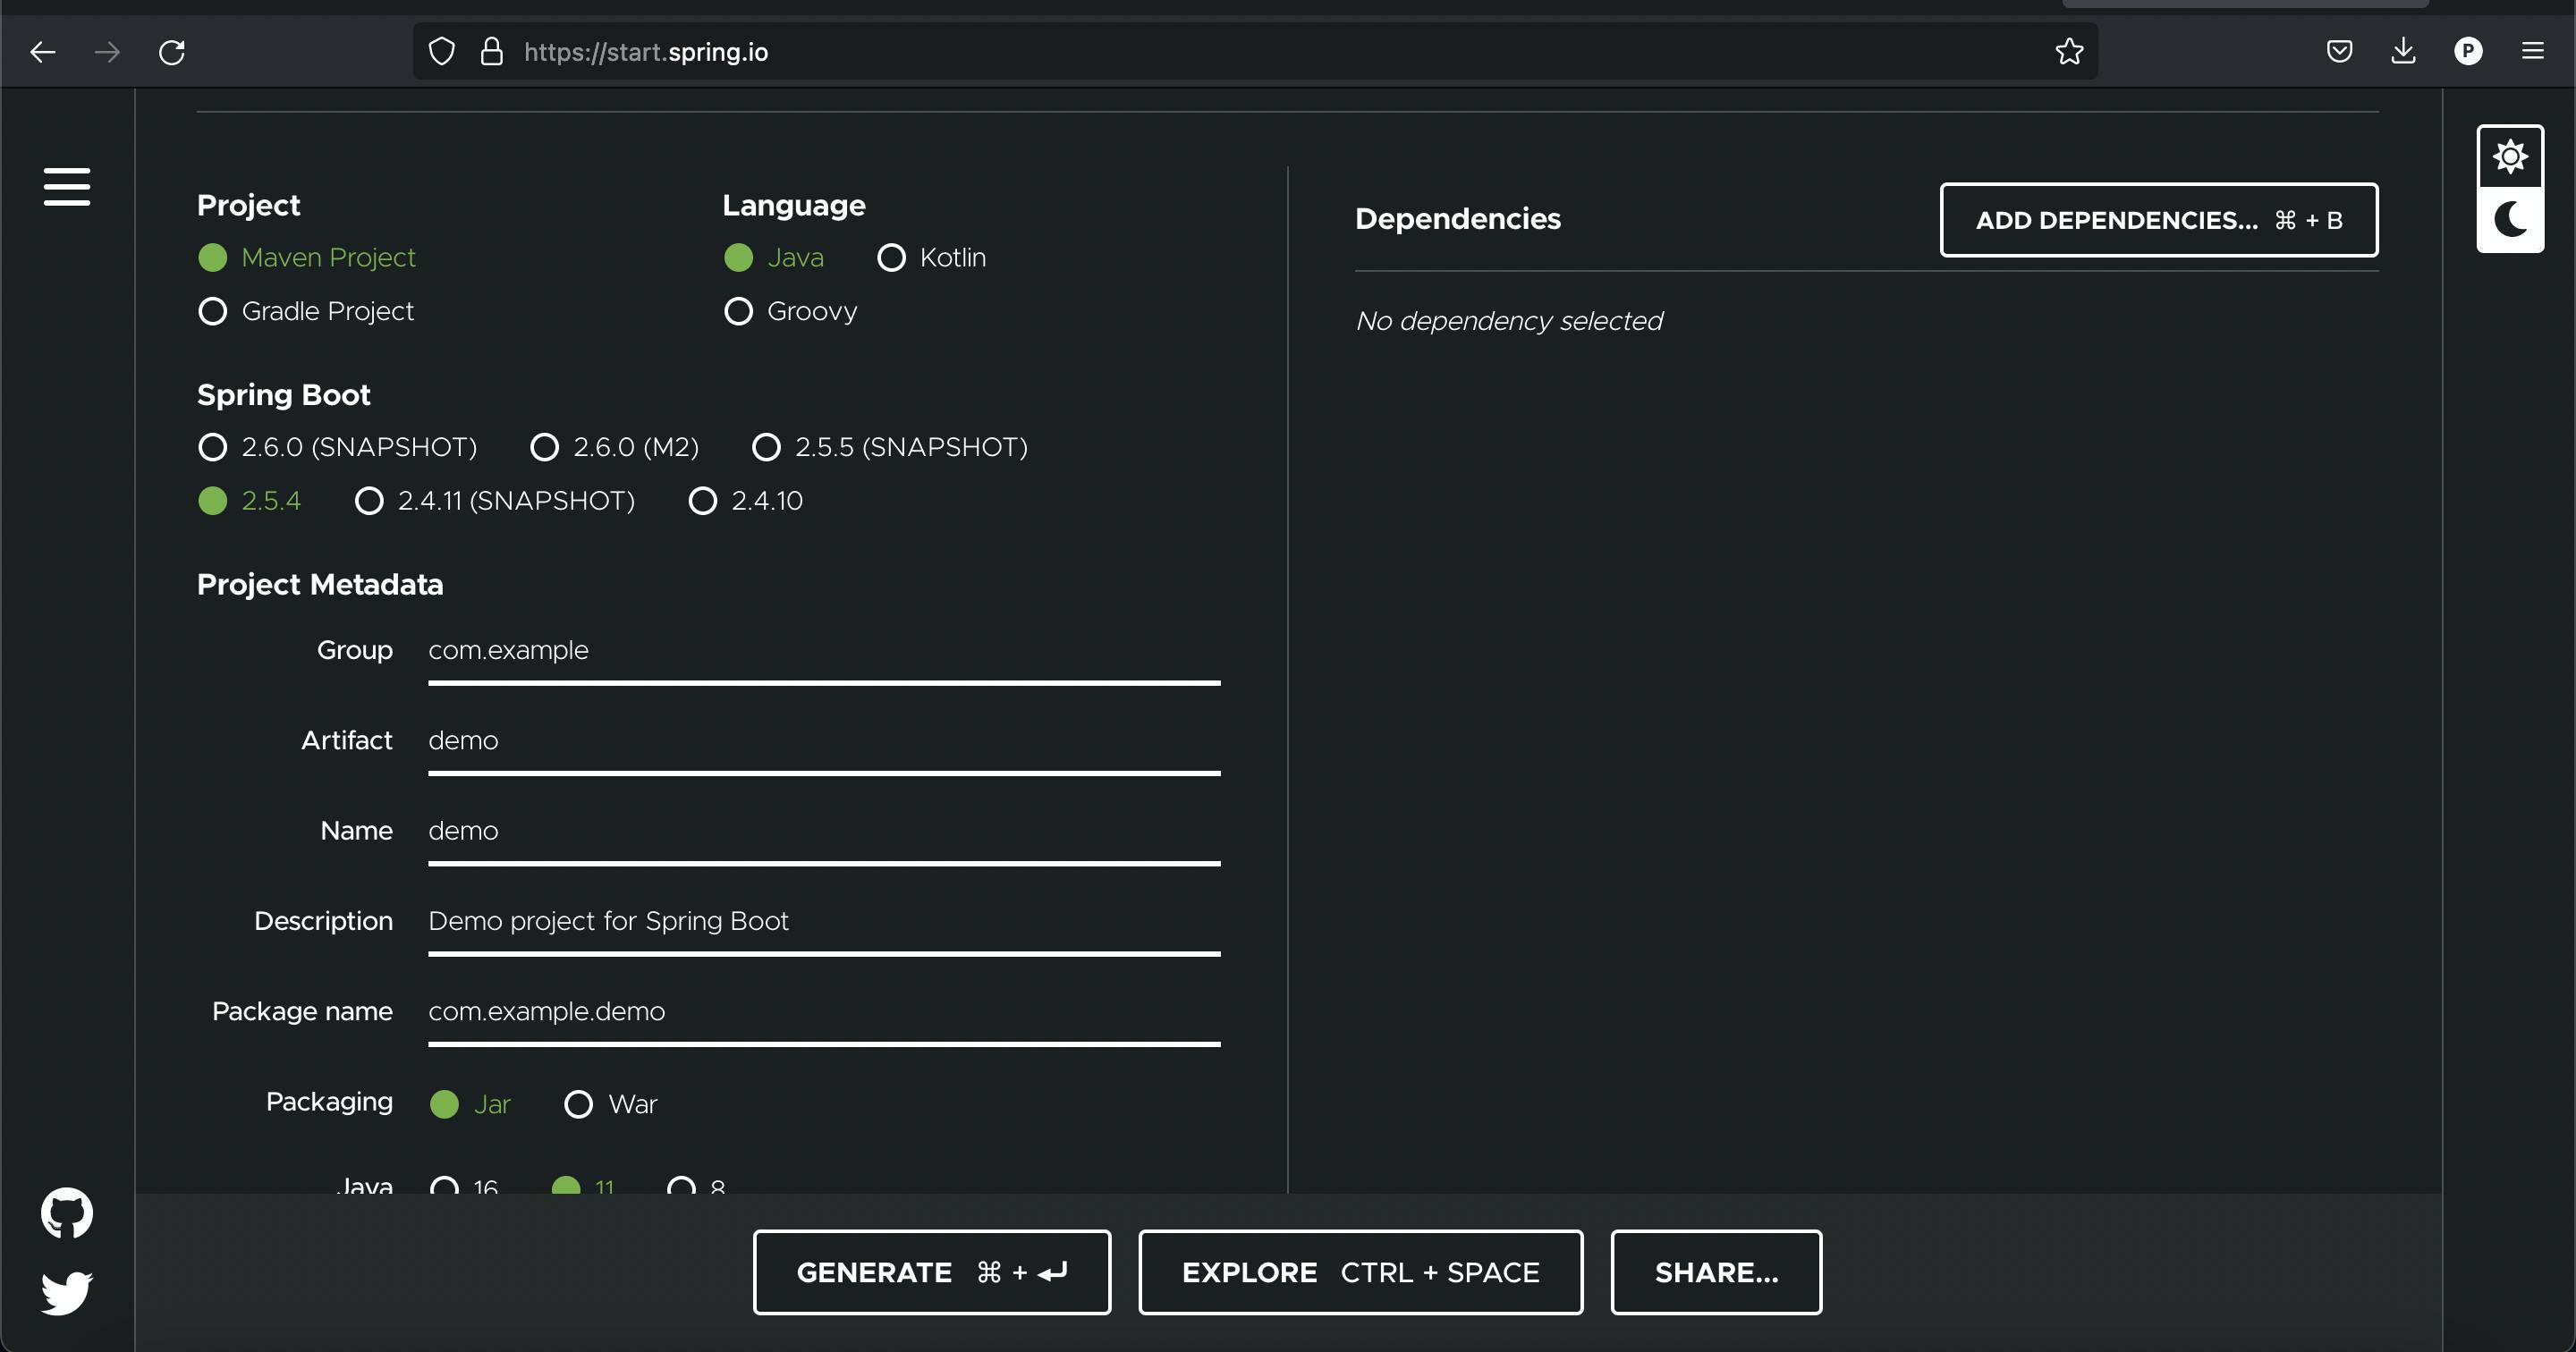
- On the left, topmost option for "Project" we're going to pick Maven. This will be our project's dependency management tool. As for the "Language", we'll be using Java.
- As for the version of Spring Boot, we'll be using 2.5.4 as it's the latest LTS release.
- We're gonna leave the project metadata to default but of course you can change the same if you'd like. I'm gonna leave it to default for this tutorial since it's our first project.
- For the packaging, we'll be using the JAR package.
- Pick the version of Java as the same you've installed in the JDK package above. Since I'm using Java 11, I'll be selecting the same.
Fun fact: JAR stands for Java ARchive
Let's get to the slightly more fun part, adding the dependencies. Click on the "Add Dependencies" button on the right-hand side to select the dependencies. You will see a pop-up similar to this:
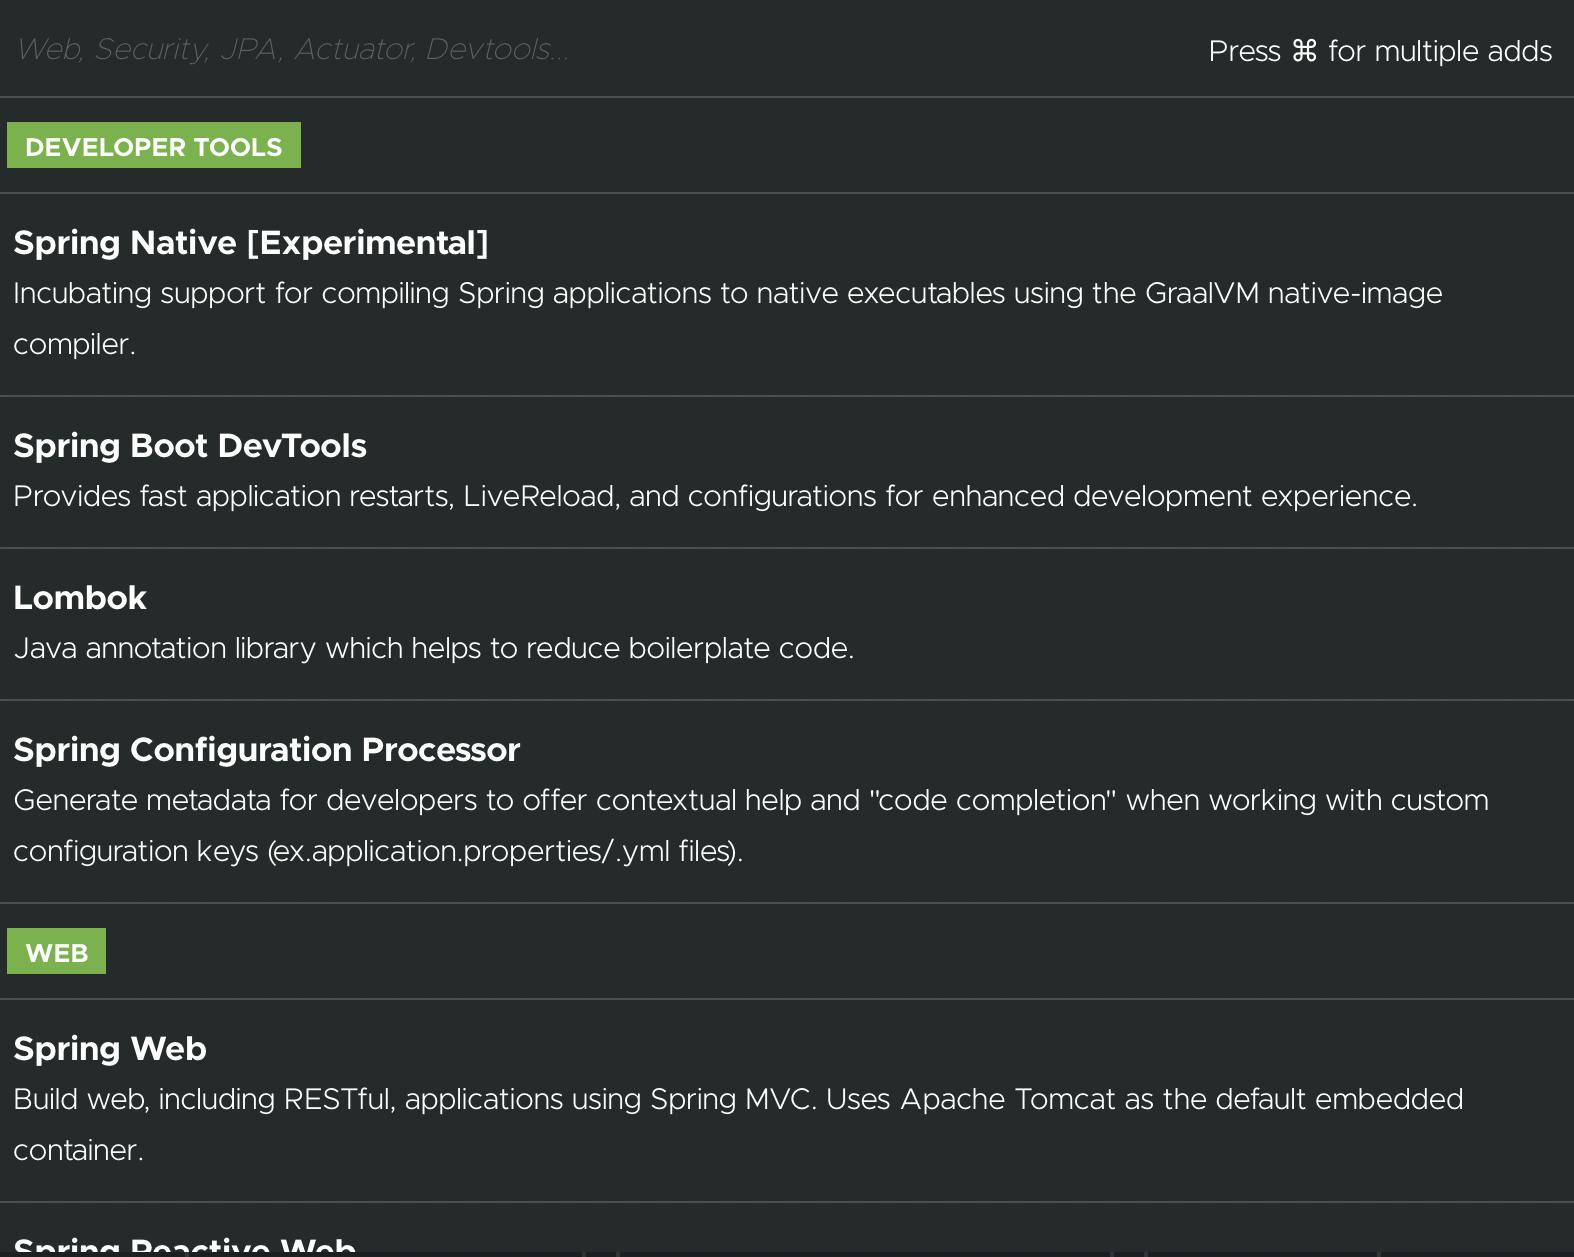 In the Developer Tools section, let's select:
- Spring Boot Devtools
Now if you scroll down to the Web section, you'll see a list of dependencies. We'll be installing a few of them namely:
- Spring Web
- Rest Repositories
Now click on the Generate button on the bottom left, your download of the JAR package should begin! Ta-da that is your spring application! It will install a folder with a .zip extension, so now all you have to do is extract it.
- On macOS, double-tap, and the folder gets extracted.
- On other OS, right-click and "extract here".
Open this folder in your favorite IDE now!
Note that since we're working on a simple web API, we'll be only installing those dependencies. But feel free to explore!
If you're stuck in the dependency installation, here is a link that has all the settings configured to Java 11: start.spring.io/#!type=maven-project&la..
Understanding the project folders and files
There are loads of folders and sub-folders and files in the project, do you need to understand all of them? Nope, we're gonna go through a couple of files and folders which you will be working on in this tutorial.
This is what your folder structure will look like:
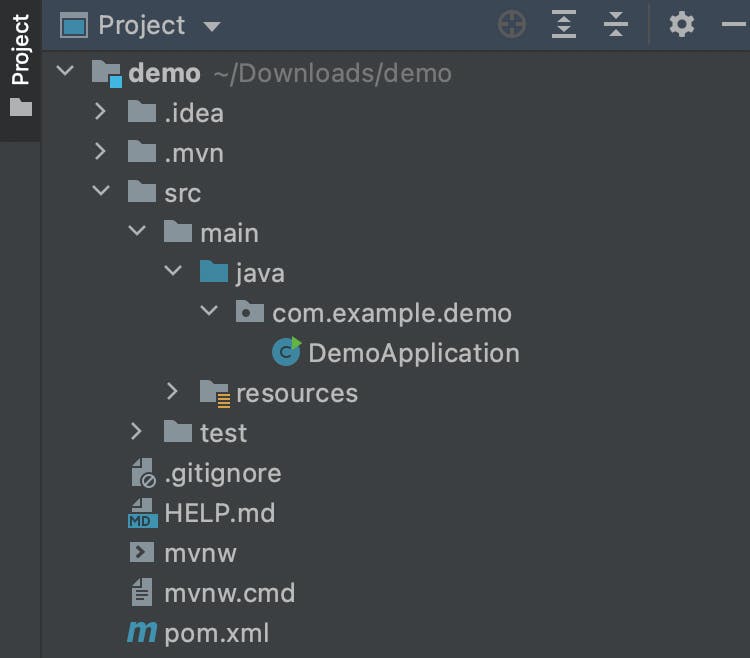
pom.xml: Here lie all your dependencies, whenever you want to add more dependencies, you go in here and add it!
src->main->java->com.example.demo->DemoApplication: This is where you Spring application starts.
Creating a controller
What is a controller?
A controller is a service that deals with the incoming requests and sends a response.
Let's create a new package in src->main->java->com.example.demo and let's call it "controllers" and have a java class named "helloworldcontroller" in it.
We're gonna use the annotation @RestController before our class is declared. This annotation is used to declare the class as a Restful class.
Google definition: Annotation indicates a default value expression for the field or parameter to initialize the property with.
Let's now declare a method that will be a GET request and for this, we will use the @GetMapping annotation to make the method a GET controller. And now let's create the method which will look something like this:
@RestController
public class helloworldcontroller {
    @GetMapping
    public String helloworld(){
        return "Hello world";
    }
}
And ta-da our, GET request handler is ready! Let's now test our application, open the terminal and enter this command:
./mvnw spring-boot:run
Or you could run the application directly from the RUN menu. By default, your Spring Apps runs on localhost:8080 so let's open that page in the browser and you have the "Hello World" printed on the browser screen.
Yay you've created your first RESTFUL service! 🥳
Let's now create a POST request and then fetch that data via a get request!
Creating a POST request that sends some useful information
Let's create a new class in the controllers' folder and let's give it the name "userinfo".
Like we did earlier, let's declare this as a restful class, so we'll be using the @RestController annotation right before declaring the class.
Let's declare a method now, which uses the @PostMapping annotation before the declaration.
Let's write the method now which takes in @RequestBody as a parameter. Let's also set a custom path for our POST request by adding curly brackets right after the PostMapping declaration, something like this:
@PostMapping("/user/addinfo")
So now our class looks something like this:
@RestController
public class userinfo {
    @PostMapping("/user/addinfo")
    public String addUserInfo(@RequestBody String userInfo){
        return userInfo;
    }
}
Let's restart our application now since we've added some changes.
Let's open Postman now to test our API.
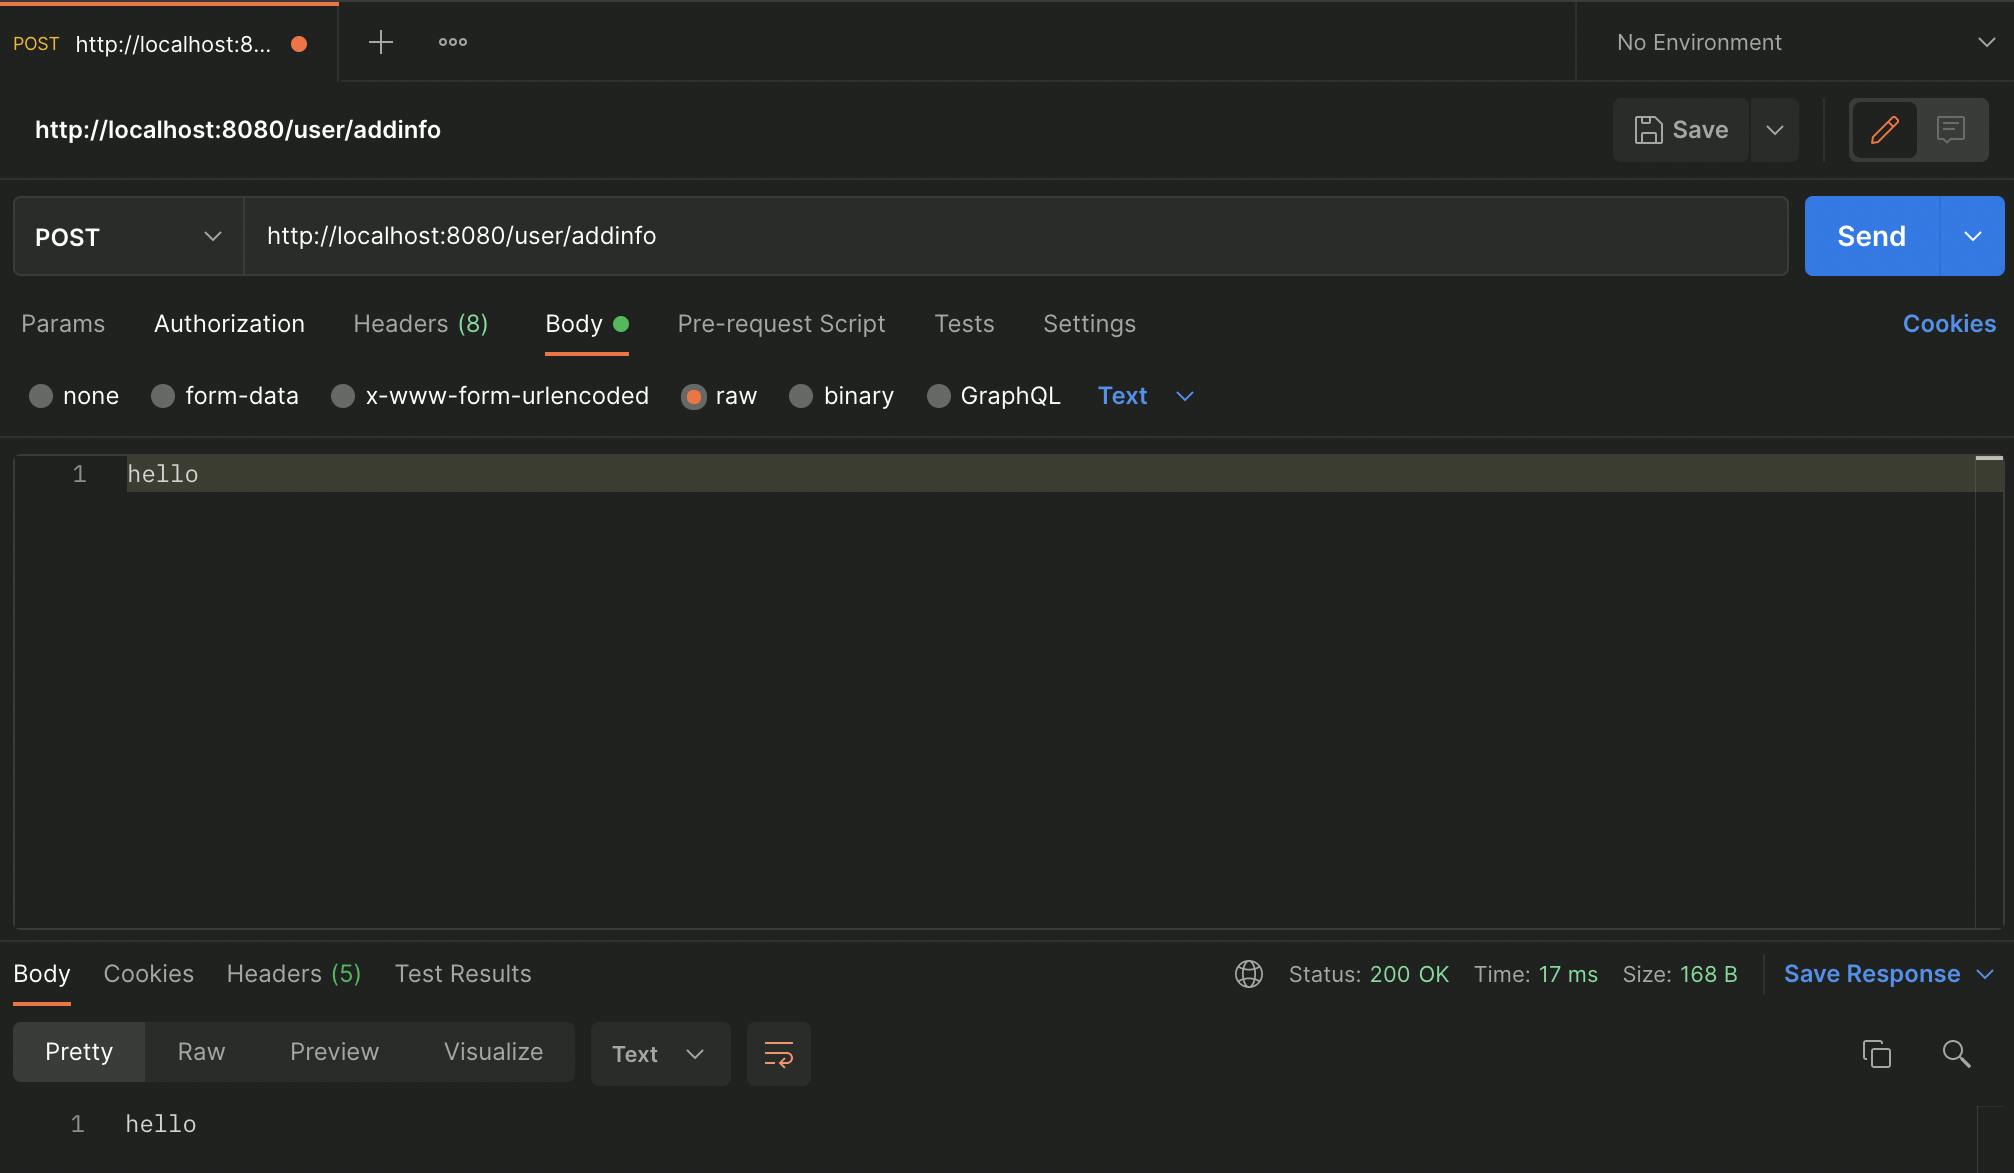
Open a new tab and enter the URL: http://localhost:8080/user/addinfo and set the request type to "POST". Let's go to the body tab now and in the raw section let's add any random text say in my case "hello". On hitting the SEND button, we get a "hello" printed out.
But we want to send in some useful data such as JSON objects with user information, so let's create a POJO class.
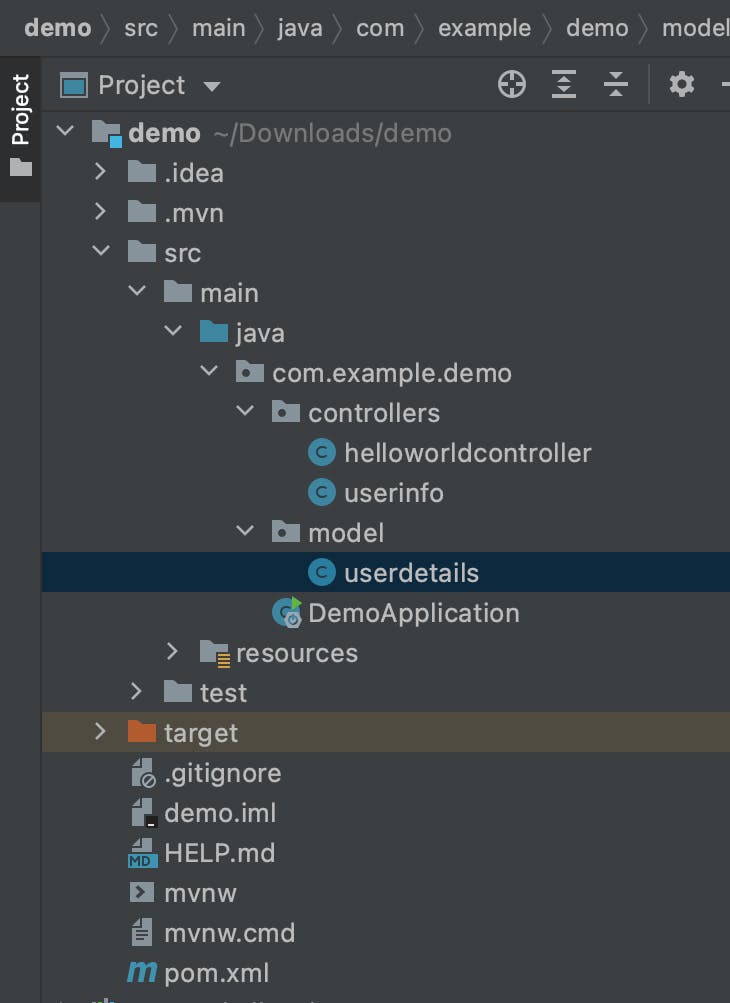
Create a new package on the path src->main->java->com.example.demo with the name "model". Create a new class in this folder by the name: "userdetails".
So now our folder-file structure looks something like this:
 Once we're done with this, let's move onto writing our POJO class.
POJO stands for "Plain Old Java Object"
Creating a POJO class
Since we cannot directly extract Strings off the JSON object, we'll be using this POJO class to deserialize our JSON object that is coming in the request body.
Let's start off by declaring String variables:
private String username;
private int age;
private String email;
Let's write the getters and setters now, if you're using IntelliJ Idea:
- On macOS, do a Cmd + N
- On any other OS, right-click and click on "Generate" Now click on Getters and Setters.
Yay! Your POJO class is ready now!
If you're using any other IDE, you could type this code out or just copy-paste it:
public class userdetails {
    private String username;
    private int age;
    private String email;

    public String getUsername() {
        return username;
    }

    public void setUsername(String username) {
        this.username = username;
    }

    public int getAge() {
        return age;
    }

    public void setAge(int age) {
        this.age = age;
    }

    public String getEmail() {
        return email;
    }

    public void setEmail(String email) {
        this.email = email;
    }
}
Let's go back to userinfo.java now and make a few changes, shall we?
Our method looks something like this right now:
public String addUserInfo(@RequestBody String userInfo)
Let's use our POJO class and create an object directly in the request we are receiving.
So I've imported the class and I've made this change here:
public String addUserInfo(@RequestBody userdetails details)
Now let's change the return statement to:
return details.getUsername();
This will return the username in the request we've passed!
So now our userinfo.java class looks something just like this:
@RestController
public class userinfo {
    @PostMapping("/user/addinfo")
    public String addUserInfo(@RequestBody userdetails details){
        System.out.println(details.getUsername());
        return details.getUsername();
    }
}
It's the time to test our API now!
Let's open Postman and again, send a request to http://localhost:8080/user/addinfo and in the body let's add the following JSON object:
{
    "username": "pratham",
    "age": 18,
    "email": "demo@xyz.com"
}
Feel free to replace the name, age, and email!
We need to change one last thing:
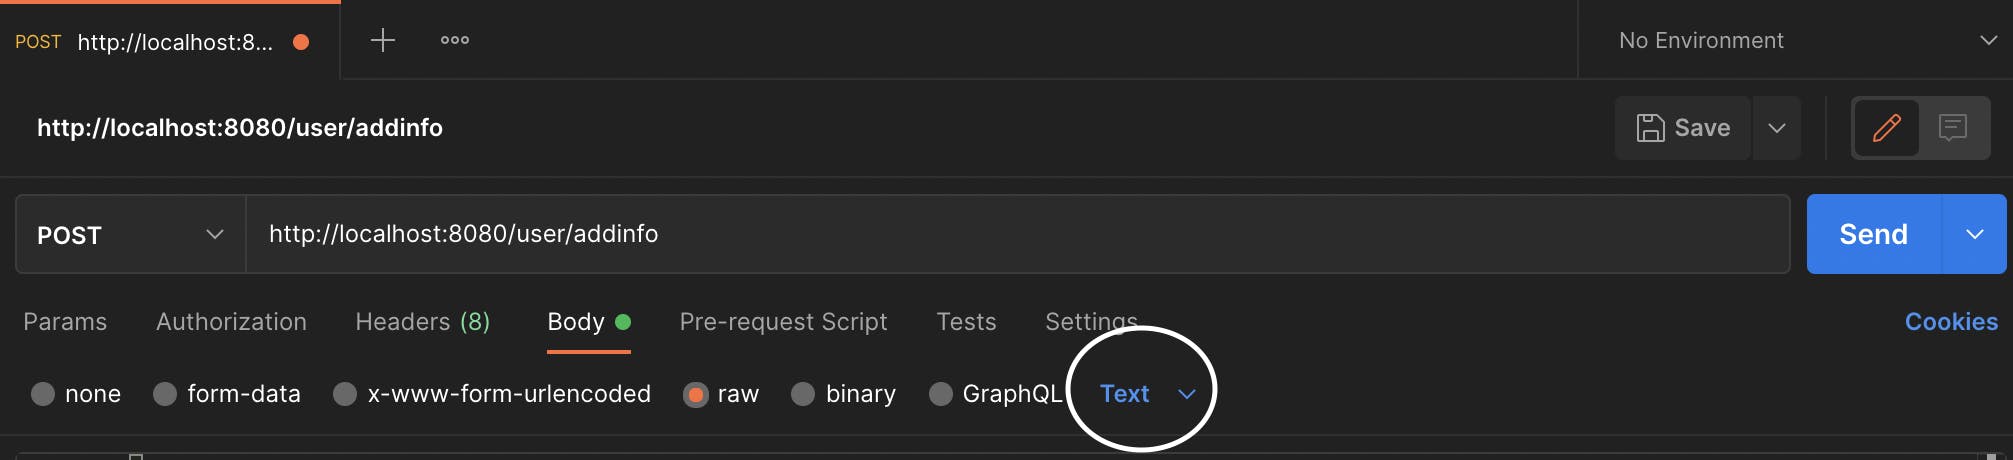 This dropdown as shown in the photo, let's change that to JSON.
We're good to send the data now! Let's hit send!
On our response panel, we can see the name we passed in the request printed out! Yay, our application works!
Looking back at what we've learned
We've created a simple web API that has 2 controllers, a GET and a POST. We also learned to create a POJO and use it!